Want to know how to install frameless cabinets? This article demystifies the process, giving you a straightforward route from tool selection to the final adjustments for your frameless cabinetry.
You’ll find concise, easy-to-follow instructions to help you achieve a sturdy and polished look in your kitchen with zero guesswork.
Frameless Cabinets Installation Guide
Here’s a step-by-step guide on how to install Frameless cabinets.
Key Takeaways
Proper preparation involves assembling a complete set of tools, including a tape measure, stud finder, level, drill, scribe tool, and other specific items necessary for the precise installation of frameless cabinets.
Frameless cabinet installation requires techniques to handle wall imperfections, such as using scribe tools for custom panels, adding extra depth to end panels for scribing, shimming behind cabinets, and using filler pieces to achieve flush finishes.
When installing frameless cabinetry, begin with the corner cabinet to set a precedent for alignment and aesthetics, and follow specific steps for securing, leveling, and attaching all cabinets, both upper and lower, and add final touches with doors, drawers, and hardware.
Prepare Your Tools and Materials

Installing frameless cabinets requires meticulous preparation, akin to outfitting oneself for a major voyage. Ensuring you have the correct arsenal of tools is paramount in this endeavor.
Your essential toolkit should comprise items such as a tape measure for precise measurements, a stud finder to fasten your cabinets onto wall studs securely, and both drill and bits for creating necessary holes.
A pencil and scribe tool are also key components for marking alignments accurately.
Due to their design lacking face frames, accuracy with these instruments becomes all the more critical during installation.
There may be instances calling for additional equipment like circular saws or clamps—to assist in cutting or securing elements—as well as shims, ledger boards, nails, or hammers that facilitate leveling and steady placement against walls.
Initiating your modern kitchen upgrade hinges on this crucial first step: assembling an adept set of tools tailored to seamless frameless cabinet installations. Thus, you will set yourself up for success from square one.
Align Cabinets to Imperfect Walls
Installing frameless cabinets requires finesse to deal with the natural quirks in every home’s walls. These unique traits can introduce obstacles, yet we employ strategies to ensure a smooth installation process for these elegant storage solutions.
An effective strategy to tackle inconsistencies along the wall is to increase the thickness of cabinet end panels that will be visible by 1/4” to 1/2”. This extra material provides leeway when fitting against walls that may not be entirely straight.
Shims play a crucial role. They’re used behind both base and wall cabinets to achieve level alignment and securely attach them to the structural studs within the wall.
For scenarios where significant deviations exceed 1/2”, procuring larger panels that can be expertly trimmed using scribe tools for a perfect fit against uneven surfaces might become essential.
Rest assured that we explore these methods in detail as we discuss specifics for seamlessly installing your frameless cabinetry into the space.
Use Scribe Tools for Custom Panels
Within the realm of frameless cabinet installation, a scribe tool is indispensable in shaping end panels so they conform perfectly to the unevenness of walls.
It’s critical to achieve that custom-fit look whether you adopt American methods with separately supplied and post-installation attached scribe moldings or choose European techniques, which require accurate trimming on flat panels.
If cabinets are to be set against walls where gaps exceed 1/2 inch, acquiring larger fillers or panels may become necessary. With a trusty scribe tool at hand, these can be tailored precisely.
Trace wall irregularities onto the material, cut accordingly, and affix it snugly using glue and nails.
Although this task requires exacting attention to detail, the fruits of such labor are unmistakably evident: a flawlessly integrated cabinet-to-wall interface that stands as evidence of superior workmanship.
Ensure Flush Finishes with Fillers
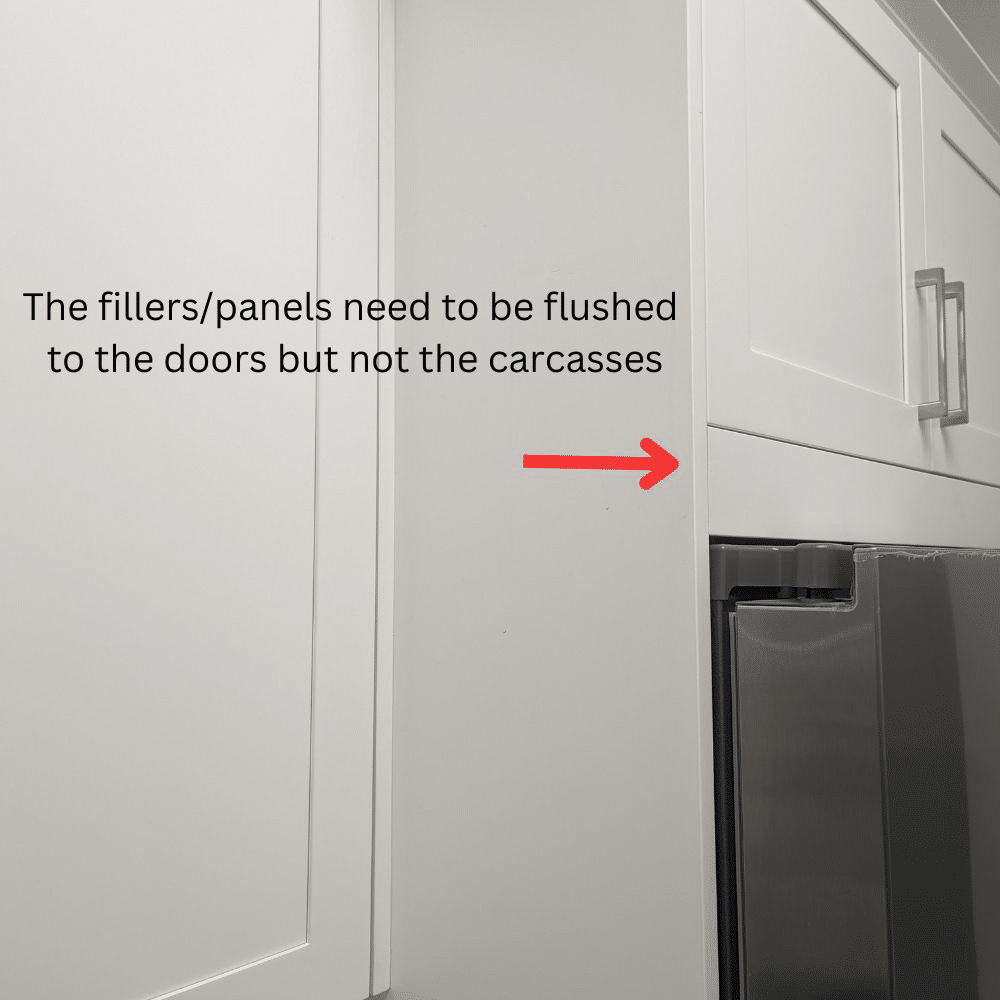
Utilizing filler pieces is the hidden gem in attaining a sleek, uninterrupted appearance with frameless cabinets. These essential elements of frameless cabinet installation serve to fill out any spaces requiring additional adjustment and maintain proper clearance among doors, floors, and drawers.
Properly aligning these filler pieces so that they are even with the doors rather than the edges of the carcass is vital. This professional approach prevents unsightly gaps between doors and drawers while concealing the inner parts of the cabinet structures.
Ultimately, it achieves a polished, integrated finish that significantly enhances your kitchen’s look.
Start with the Corner: The Keystone of Cabinet Installation
Consider the corner cabinet as the pivotal element in your kitchen’s design, much like a cornerstone is to an architectural structure.
Beginning with this key piece during installation, you establish a framework that guides the visual harmony and proper alignment of all subsequent cabinetry against the kitchen walls.
Installing from the corner offers various benefits for setting up kitchen cabinets:
It addresses issues posed by irregularities in wall and floor surfaces, guaranteeing leveled cabinets from the start.
It ensures each following cabinet fits snugly and lines up correctly.
Starting at this point makes it simpler to spot and fix small inaccuracies before proceeding with installing the remaining cabinetry.
Securing the Corner Piece
Ensuring that the corner cabinet is securely installed requires precision. Follow these steps for a successful installation.
Position the corner cabinet in its intended location.
Before securing, remove any doors to make handling easier and check that they align level with the wall.
If required, use shims to adjust until it’s properly leveled.
After positioning your cabinet accurately and ensuring its levelness, you should proceed by:
Detecting where the studs are within the wall.
Inside the cabinet on its back panel, mark where those studs align so you know exactly where to secure it.
Utilize screws along with a drill at these locations to mount the cabinets onto your wall.
The next section will discuss some tips for mounting the cabinets.
Mounting Wall and Base Cabinets
Beginning with the foundational element set, it’s time to construct the remaining parts of your build. Ensuring accurate alignment and spacing is a critical aspect when setting up lower cabinets for a frameless design.
Here are steps to achieve this:
Utilize screws to secure each of the lower cabinets together.
Make necessary adjustments around appliances as they come into play.
After all screws have been inserted, revisit levels across cabinets for consistency once more.
Let’s not jump too far ahead just yet. Before installing those lower units, we must understand how upper cabinetry should be addressed within our project scope.
Installing Wall Cabinets with Care
Consider wall cabinets the elite within cabinetry. They are typically mounted first by hoisting them into their designated spot and securing them firmly in place before any lower cabinets may obstruct the process.
Creating a temporary support structure or using an independent cabinet prop is essential to maintaining these cabinets at an appropriate height while installed.
To achieve precise alignment during installation, adhere to this procedure:
The prevailing “standard” among kitchen remodelers is 54 inches from the floor to the cabinet’s bottom edge. That leaves an 18-inch space between the countertops and the upper cabinets.
Positioning your initial cabinet is key. Ensure its bottom and front edges serve as guides since all subsequent cabinets will follow suit for uniformity.
Alongside this line, fasten a ledger board, which will act as a level reference and an elevation guide throughout mounting.
Identify where studs lie behind the wall, transpose those measurements onto your cabinet back panel, pre-drill pilot holes accordingly, then use clamps and shims if necessary, along with screws to secure each unit collectively against one another.
By carefully following these instructions, you can guarantee that your cabinets will be robustly anchored while maintaining neat alignment across all units involved in the installation.
Attaching Base Cabinets and Ensuring Level
Ensuring the base cabinets are properly leveled is paramount when dealing with frameless cabinet installation, as any discrepancy in alignment might disrupt the functionality of both doors and drawers.
The process of mounting base cabinets involves several steps.
Employ shims and screws to affix them firmly against the wall while making sure they’re level from every angle.
Bind neighboring lower cabinets side by side using clamps, tweaking until their front surfaces align seamlessly.
Once aligned and shimmed, if necessary, fasten these together utilizing screws.
If installed accurately, a countertop placed atop the base cabinets should sit level without additional shimming required.
Attaching Frameless Cabinet Boxes Together
Once the individual cabinets are arranged, focus on constructing the complete setup. Combining frameless cabinet boxes is akin to piecing together a complex puzzle, with every component needing to align perfectly with its surrounding parts.
Before securing them, clamping the walls of two neighboring cabinet boxes firmly in place is crucial. This guarantees a precise and snug fit between units.
When attaching cabinets using screws, make sure they’re sufficiently short so that they don’t poke through the opposite side of the wall.
It’s also possible to link multiple cabinets into one larger section before affixing them against a wall, which can streamline shimming and mounting.
Observe these instructions for optimal assembly:
Securely clamp two adjacent cabinet box walls.
Employ screws of an appropriate length for fastening.
Optionally combine several cabinets into one block beforehand.
Carefully shim and secure this formation onto your desired wall area.
Initially, connect everything lightly so as not to hinder adjustments.
After confirming alignment, tighten all connections firmly.
Adhering diligently to this procedure will ensure your frameless cabinetry is installed neatly and sturdily within your space.
Drilling Pilot Holes
Creating pilot holes is an essential part of the cabinet assembly process to avoid splitting the wood. Opt for a drill bit size that’s just a tad smaller than the screw diameter you’ll be using.
Make sure to maintain the drill bit at a perfect right angle to the surface during drilling, ensuring proper alignment of screws.
When attaching lower cabinets, you should check with your cabinetry manufacturer for guidance on how far apart each hole should be placed.
Clamping and Screwing Technique
Ensuring a tight bond between two cabinets during installation is akin to giving a strong handshake. It’s all about establishing a solid connection.
Selecting the appropriate clamps is integral in keeping cabinets lined up as you assemble them.
There are several clamp varieties, each with distinct advantages. The bar clamp stands out for its simplicity of adjustment, which can often be done single-handedly, making alignment easier.
Conversely, vice-grip clamps are equipped with swivel pads and offer substantial clamping power and convenient one-handed application.
Locking C-clamp pliers is an excellent choice to effectively secure a grip on hinge mounts.
They play a critical role in holding cabinet walls close enough so that when screws are driven in, they anchor firmly into the neighboring cabinet—this ensures both proper alignment and enhances the overall stability of your cabinetry setup.
Adding the Final Touches: Doors, Drawers, and Hardware
Approaching the end of assembly and applying the finishing touches is crucial. This includes fitting the doors and drawers into your cabinet, which is best reserved for later installation to avoid scuffing them during movement.
Once installed, carefully adjust the cabinet doors using hinges that allow modifications for even gaps and a seamless appearance.
Drawer slides must be aligned accurately and mounted on an even keel for optimal performance. This will facilitate smooth gliding action.
Should any sticking result in loss of soft-close capabilities, shims (supplied by the maker) inserted behind the drawer tracks may become necessary.
Adjusting Doors for Perfect Alignment
Cabinet doors play a pivotal role in frameless cabinetry. They are prominently visible to onlookers and endure the brunt of daily use, so it is essential to ensure their alignment is precise.
Modern cabinet designs, including wall-mounted and corner varieties, include hinges that offer comprehensive adjustability. These allow alterations in three dimensions: height (up or down), width (side to side), and depth (forward or backward).
When you align one door correctly, it may cause a slight misalignment among adjacent ones. Hence, minor tweaks across all doors might be necessary for consistent spacing and uniformity.
For affixing cabinet doors firmly, it’s advisable to alternate tightening screws diagonally at opposite corners. This approach helps distribute tension uniformly while preventing any warping of the door.
Installing Drawers and Hardware
Selecting the appropriate hardware for your cabinets and drawers is akin to picking out the perfect accessories to complement an ensemble. The ideal selection of knobs and pulls not only boosts the aesthetic appeal but also improves how well you can use your storage spaces.
It’s recommended that knobs be employed on cabinet doors while handles are reserved for drawer fronts due to their ease of use.
When installing hardware, especially on frameless cabinets, it’s crucial to ensure uniform placement by using a template or jig—this ensures precision in alignment with the edges of each cabinet box.
Remember, sufficient space must be between the front drawers and the countertops. This gap permits the unobstructed operation of drawers and lessens any visible unevenness through larger reveals.
Navigating Common Challenges with Frameless Cabinetry
Installing frameless cabinets can be challenging. Unlike face frame cabinets, they are particularly unforgiving if faced with uneven walls or floors.
When installing frameless cabinets, consider applying these methods to overcome potential issues.
Employ shims for leveling and aligning the cabinets perfectly plumb.
Utilize filler strips to conceal any spaces that emerge from shim adjustments.
Confirm ample space is provided for unobstructed operation of doors and drawers.
Keep a consistent visual appeal during the entire process of installing your cabinetry.
Summary
Thus, we’ve guided you through each painstaking stage, from readying your equipment to affixing the last hardware component in installing frameless cabinets. This task demands a blend of patience, meticulousness, and acute attention to detail.
The reward for this careful process is a sophisticated kitchen with modern aesthetics that showcases your skilled handiwork. Embark on this transformative journey and elevate your kitchen into a contemporary showcase by installing frameless cabinets!
Frequently Asked Questions
Here are the frequently asked questions about frameless cabinetry.
What is The Gap Between Doors on the Frameless Cabinets?
For frameless cabinets, the typical spacing is 1/8 inch for a single-door box and increases to 1/4 inch for a double-door box, provided that full overlay hinges are used.
What Screws to Use For Frameless Cabinets?
When installing frameless cabinets, it is advisable to utilize wood screws that are either 2-1/2 inches or 3 inches in size and #10 in diameter. This choice provides better shear strength than if one were to use drywall screws.
For the rear panels of these cabinets, Spax screws measuring 1.25 inches long and sized #8 are an excellent selection, particularly because they perform effectively with MDF/particle board materials which frameless cabinets often comprise.
What are The Disadvantages of Frameless Cabinets?
The installation of frameless cabinets can be challenging and may often require adjustments to the hinges. They tend to lack the stability found in their framed counterparts.
Frameless cabinets typically cost more than conventional styles as they align with current fashion trends.
Are Frameless Cabinets Difficult to Install?
Installing frameless cabinets presents its own challenges when it comes to adjusting hinges and ensuring stability—a task that is often more straightforward with framed cabinetry.
You should consider these particular considerations when selecting frameless cabinets for your endeavor.
What Tools do I Need to Install Frameless Cabinets?
A set of tools is necessary to install frameless cabinets accurately and securely. These include a tape measure for precise measurements, a stud finder to locate wall studs, a level to ensure evenness, a drill with corresponding bits for making holes, pencils for marking positions, and a scribe tool during the installation process.


